
Knowledge base
May 05, 2022
9 Microsoft Teams features you should be using for your meetings
Before the pandemic, many people didn’t even know Microsoft Teams existed. Millions of other people used a hodgepodge of different communication tools at work. Now it’s hard to remember what life was like before Teams.
Here’s a deeper dive into some of the best Microsoft Teams meeting features.
- Summary of the meeting
- Virtual whiteboards
- Loop components
- Featured
- Presenter mode
- Comments on the meeting
- Together mode
- Mute notifications
- Meeting polls
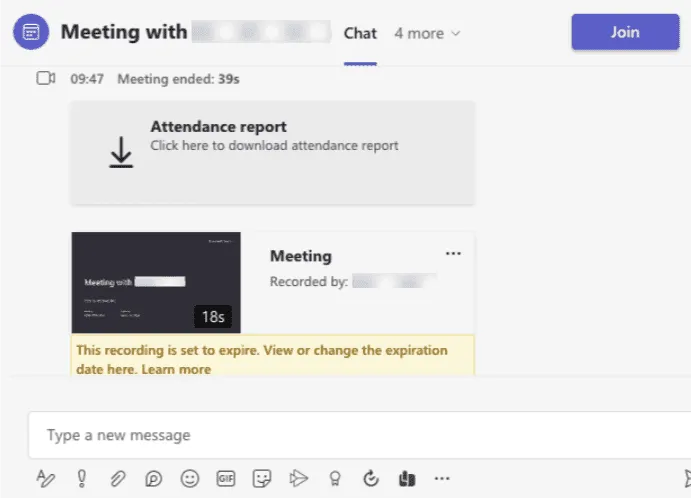
1. Summary of the meeting.
If you can’t attend a meeting live (or if you just need a summary), Teams allows you to easily revisit the meeting materials.
Once a meeting ends, Teams automatically saves all the material associated with the event: the video recording (if you recorded it), any shared files, loop components, and, if you are the host, the attendance report. If you turn on live subtitles (another great Teams meeting feature, by the way – it can even translate into different languages in real time), it also saves a copy of the transcript.
You can find all the summary material in the meeting chat window or in the Details section of the invitation in your Teams calendar.
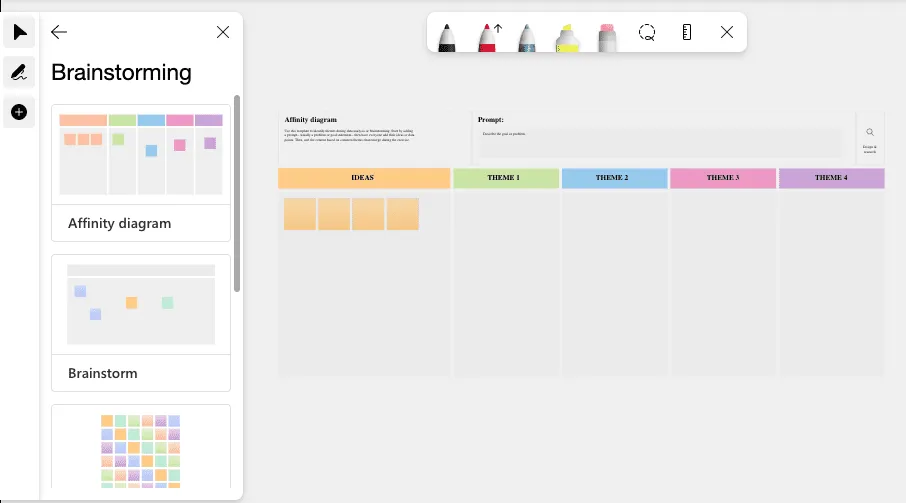
2. Virtual whiteboards
Virtual whiteboards make office brainstorming sessions seem so inefficient, not to mention boring. Think about it: it’s so common for a dozen people to collaborate on a virtual whiteboard, but can you imagine everyone sitting around an office board with a marker in their hand?
Teams’ virtual whiteboards go beyond that, making it feel like a customized online whiteboard app.
You can drag and drop images and video directly to a whiteboard and create shapes like arrows and perfect rectangles without trying to draw them (very badly) freehand on the board. But my favorite part is the templates. There is a full catalog of various meeting-related templates (e.g., brainstorming, SWOT analysis, and affinity diagrams) that you can drop on your board and start scribbling as a basis for your meeting.
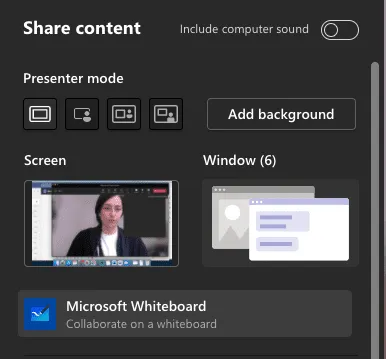
To access a virtual whiteboard during a meeting, press the Share button and select Microsoft Whiteboard (you will also see a whiteboard button in the chat menu).
And yes, whiteboards are also automatically saved in the meeting summary. I swear they have thought of everything.
3. Loop Components
The name of this feature makes it sound like you need a CS degree to use it, but it’s really just a fancy name for a simple concept. Microsoft’s loop components are interactive units that allow you to collaborate and make decisions together in chat during a meeting. Think: a calendar, a to-do list or even an event plan.
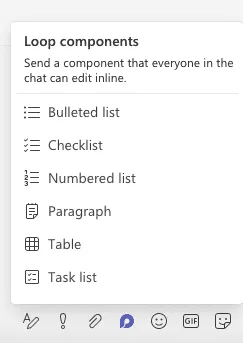
You send a component during the meeting and everyone can edit and collaborate on that component in real time. Any loop items you create are saved in the meeting chat and also saved in OneDrive, so you can continue working on them after the meeting.
To create a loop component, click the loop icon in the meeting chat window. A few different options come up: pick the one you like and start working together.
4. Spotlighting
Watching 49 faces on one screen is intense, especially when a few different people are speaking. The spotlight feature in Teams allows the organizer or presenter to decide which participant(s) should be the main focus of the meeting, rather than just highlighting the one who came to the meeting first.
Putting a participant in the spotlight enlarges their window and brings them to the top of the screen so they are more prominently displayed. You may want to highlight senior management in a team meeting or a panel of people who will be presenting.
It’s also easy to switch who is in the spotlight: click on the three dots to the right of their window and hit Spotlight. You can highlight up to seven people at a time and the same view will be displayed for everyone in the meeting. For your information, spotlighting does not appear in meeting shots, and it also does not work when you are in the large gallery view or collaborative mode.
(P.S. Does this all sound terrifying to you? If you’re feeling a little camera-shy and want to de-spotlight yourself, you can go to People > participants and click on the three dots next to your name. You will see there the option to exclude spotlight).
5. Presenter Mode
There was a time when giving presentations online felt impersonal and awkward. But meeting technology has advanced so rapidly that presenting in person now feels pretty old school.
Teams has a few presentation modes you can use when working with slides during a meeting, and they are all very slick and engaging.
- Content only. These are just your slides on the screen.
- Side by side. As it sounds: you and your slides in separate boxes next to each other.
- Notable. Here your background is replaced by your slides and you move the mouse pointer over the top.
- Reporter. Your slides appear in a box above your shoulder as – you guessed it! – a news reporter.
To turn on Presenter Mode, go to Share in the upper right corner once your meeting starts and select one of the options under Presenter Mode. Place the mouse pointer over the icons and the name of each option is displayed.
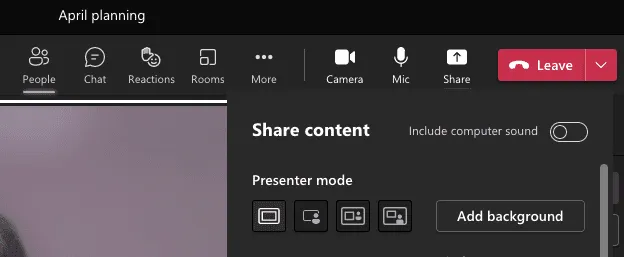
You can also switch from one mode to another in the middle of your presentation by clicking on the icons displayed in the presenter’s toolbar at the top of the screen.
6. Comments on the meeting.
If you’ve ever presented online to a sea of people who are all on mute, you know how uncomfortable it can feel. Not being able to read people’s reactions or get the occasional encouraging nod from your teammates is not good for your self-confidence.
This is where Teams’ reaction function works very well. There are five different types of responses that participants can choose from: standard rate.

When meeting participants click on a response, the responses bubble up along the bottom of the presentation slides so you and everyone else in the meeting can see them. It’s a small touch, but it has a big impact on the mood of the meeting.
If someone wants to ask a question during the presentation, they can use the raised hand icon, which puts them at the top of the screen for the host to see. There is even a keyboard shortcut for this (). Remember to repeat the shortcut to put your hand down again. An important tip for anyone who has spent an entire meeting with their hand raised.control + shift + K
7. Together mode
When you attend remote team meetings in gallery mode day in and day out, it gets a little boring. So teams spiced it up. Together Mode makes it look like you and your teammates are all in a room together. At least, that’s what it’s trying to do.

You can choose from a catalog of virtual locations, including a lecture hall, an amphitheater or (shock horror!) an office space. It sounds a little corny, but in my experience it really works. There’s just something about seeing your colleagues’ faces in a different format that brings a little life to the meeting.
To turn on collaborative mode, click on the three dots in the meeting menu and select Collaborative Mode. A list of backgrounds appears from which you can choose. Apologies to your 1:1s – for this feature to work, you must have between four and 49 people in your meeting.
8. Mute notifications
I learned about this position the hard way. I was once in the office presenting online to senior staff when a notification popped up from someone else in the office asking what I wanted for lunch. Not the most professional moment of my career.
But embarrassment aside, notifications that appear when you’re in presentation mode – or even just in the middle of a conversation – can be incredibly distracting. That’s why Teams lets you change your settings so that notifications are always muted during meetings and conversations.
Go to Settings > Notifications > meetings and calls and turn on Mute notifications during meetings and calls. This automatically keeps all in-app notifications muted for calls until you go back in and change it again.
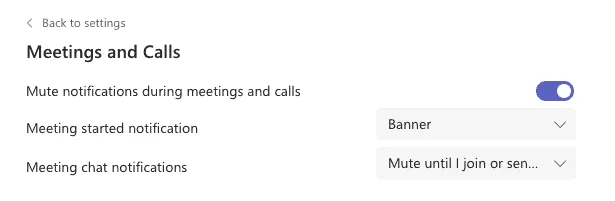
Please note that this will only mute in-app notifications from Teams. If you use other programs that send desktop notifications, you must mute them separately or use a notification blocking app.
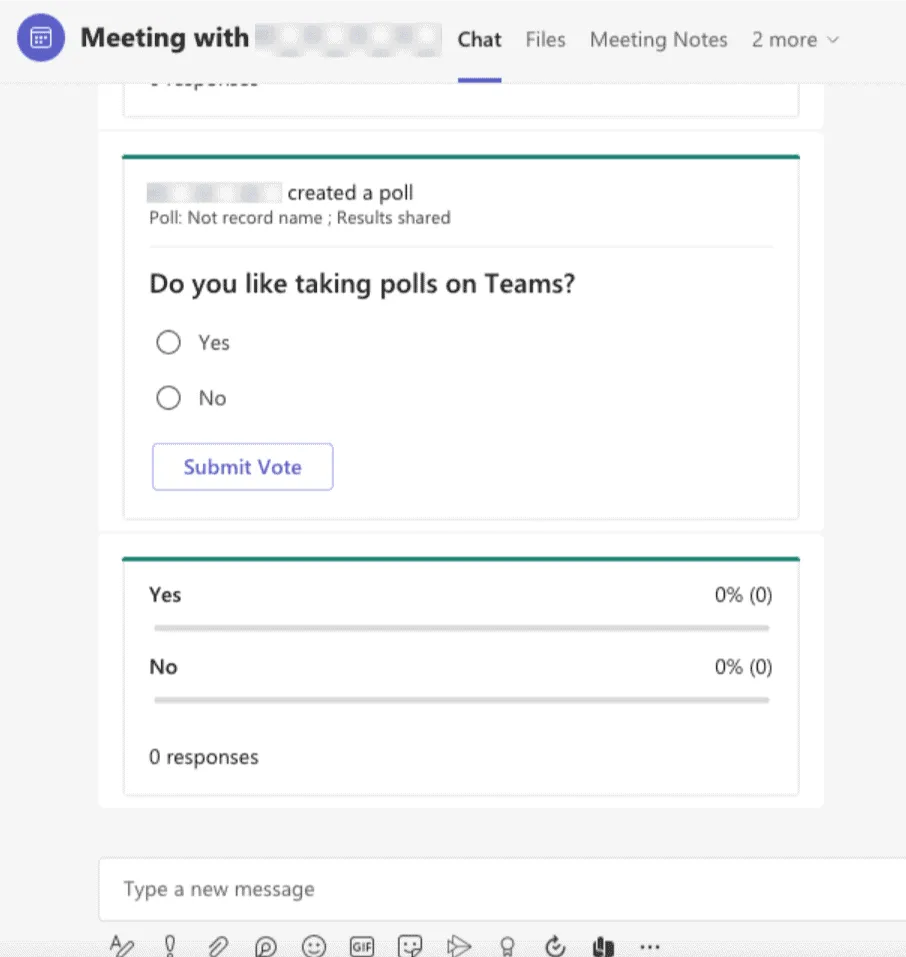
9. Meeting polls
If you are in a meeting and want to quickly find out everyone’s opinion on something, you can run a quick poll in the meeting chat window. Think of it as a “raise your hand if…” moment in a face-to-face meeting.
To run a poll, go to the message extensions button (three dots below the chat bar) and look for the forms app.

Once you select it, the option immediately appears to create a poll question and possible answers that you want to use. Add your question and click Submit. The poll appears in the meeting chat window and the results come through in real time under the poll.
Microsoft is constantly developing new meeting features for Teams – by the time you read this article, I bet something new can already be added to the list. So every time you see a new option appear in your Teams menu or a new icon appear in chat, it’s worth exploring. You probably need it – you just don’t know it yet.
Source: zapier
Want to know more?

Related
blogs


Tech Updates: Microsoft 365, Azure, Cybersecurity & AI – Weekly in Your Mailbox.