
Knowledge base
December 17, 2020
Practical tips for producing a live event in Teams.
Planning and producing your event
The most important thing is to practice. Organise various events such as rehearsals, watch the visitor experience live and on demand. Learn the system well so producers don’t have to solve problems during the live event.
Make sure there is always more than one person in the event group. Ideally, you have three people, with one person outside the presentation room. This way, you lose control of the meeting in the case of a network failure in the room.
Create a custom link (for example, with bit.ly) for the participating link. In the event of a catastrophic event, or if a producer makes a mistake, you can easily create a new broadcast event and update your custom URL to refer to it.
Invite the event group to join in about 30 minutes in advance. Share a slide with a fun intro to indicate that the event is about to begin. Then start the live broadcast about 10 minutes earlier to make sure everything works. Keep all audio muted until you’re ready to go live with your presenter at the start of the live event.
Plan your event group’s communication: real-time communication is essential for live events. The inner event chat is a good way to keep in touch.
Assign roles and responsibilities – know who is responsible for every step of the operation, from camera managers, presenters and Q&A moderators to your overall producer or director.
Audio
Don’t ignore audio: it’s the most important part of a great event. Some people might just listen with the browser in the background.
Get a good microphone for presenters. Some people don’t handle microphones well under pressure, so portable microphones can be useful for inexperienced presenters. Or use a Teams-certified headset when you’re presenting from a computer or other device.
Test the audio in the room before the event so you don’t bring noise or feedback from the room to the online event.
Add audio to the live event using any audio recording device that needs balanced audio (XLR connector) or even a headphone-like 1/8-inch plug and connect to the computer teams runs on via USB.
You can also use an advanced AV system and connect that system’s HDMI or SDI output to Teams using a simple video recording device such as an HDMI USB box.
Video
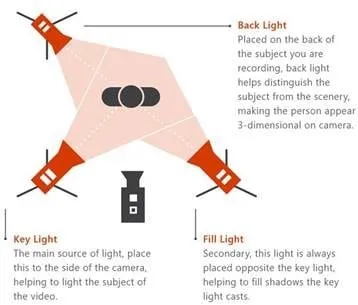
Illuminates your subject well: for most cameras you can’t have too much light. Lighting can make the difference between a production that is perceived as high-quality or amateurish.
Use three lights to illuminate your subject: a key light, a fill-in light and a backlight for good depth.
You can use a capture device to bring HDMI inputs as a camera to your meeting. For example, you can use them to connect a prosumer camera with better optical and zoom capabilities and an HDMI output as a Teams meeting camera.
These HDMI recording devices can also be used to stream a desktop to a live event to display videos or demos. Any PC or Mac with an HDMI output can be used.
Screen sharing
If you are the only event producer, we recommend using two monitors. This allows you to share the contents of the second monitor while producing the event from the first monitor.
Live teams’ events use video-based screen sharing (VBSS). Use the following planning guidelines to ensure you get the best experience:
Make sure producers and presenters are assigned the right TeamMeetingPolicy with the right IPVideo and ScreenSharing settings. If ScreenSharingMode or IPVIdeo is set to None, producers and presenters won’t be able to share their screens.
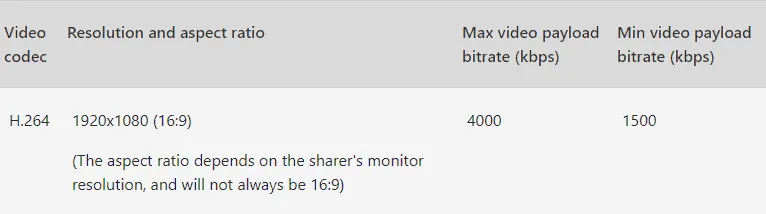
To make sure network bandwidth requirements are taken into account:
Source: Microsoft
Want to know more?
Related
blogs


Tech Updates: Microsoft 365, Azure, Cybersecurity & AI – Weekly in Your Mailbox.